You can import a CIS/2 Step file, IFC Step file or StaadPro file by selecting "CIMSteel/2 STEP (CIS/2, STP)", "IFC STEP" or "Staad.Pro STD" from the File => Import menu.
When importing from Revit Structure, you can import a CIS/2 or IFC Step file created by it or you can select the "Send Model to SPACE GASS" item from the Revit Structure "Tools > External Tools" menu as explained in "Special Revit Structure Links".
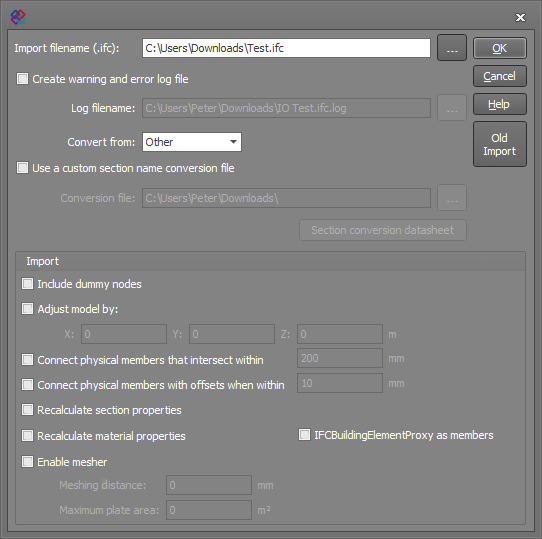
The IFC import form is shown below. The IFC importer will auto-detect the schema that the IFC file was created with, including IFC4.1 and most earlier versions. If you have problems importing old IFC2 files then as a last resort you could try clicking the "Old Import" button to revert back to the older style of IFC2 importer.
If any warnings or errors occur during the import, you can view them at the end and then save them into a log file if required. Otherwise, you can tick the "Create warning and error log file" option and then specify a filename if you always want a log file to be created.
The "Convert from" box allows you to select the program that the IFC file was created with. This is not always required, but it enables the importer to convert any section names that it doesn't recognise and apply any adjustments during the import that are specific to the program that created the file.
If you have a custom section name conversion file then you can tick the "Use a custom section name conversion file" option and specify the conversion file to be used during the import. If you want to create a new section name conversion file, refer to "Creating custom section name conversion files".
Other import options include importing dummy nodes, moving the imported model along a global X,Y,Z vector, connecting members that finish up close to each other but are not connected, recalculating section and material properties, and enabling the plate mesh tools. The "Enable mesher" option is intended for when you want to control the maximum mesh sizes. If unticked, any imported plates will still be meshed, but using default mesh sizes.
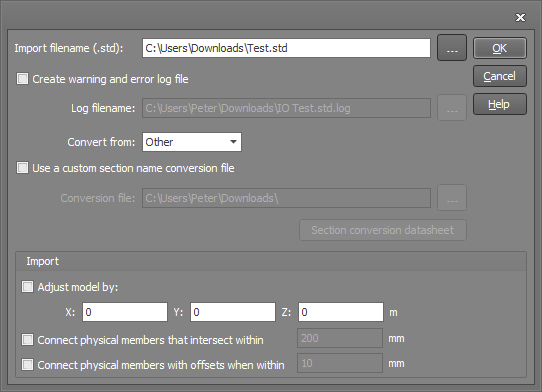
The StaadPro import form is shown below.
If any warnings or errors occur during the import, you can view them at the end and then save them into a log file if required. Otherwise, you can tick the "Create warning and error log file" option and then specify a filename if you always want a log file to be created.
The "Convert from" box allows you to select the program that the StaadPro file was created with. This is not always required, but it enables the importer to convert any section names that it doesn't recognise and apply any adjustments during the import that are specific to the program that created the file.
If you have a custom section name conversion file then you can tick the "Use a custom section name conversion file" option and specify the conversion file to be used during the import. If you want to create a new section name conversion file, refer to "Creating custom section name conversion files".
Other import options include moving the imported model along a global X,Y,Z vector, and connecting members that finish up close to each other but are not connected.
The CIMSteel/2 (CIS/2) import form is shown below. Note that plate elements can't be imported from a CIMSteel/2 file, however they can be imported from IFC, StaadPro, Revit or SDNF files.
![]()
The name of the file being imported is displayed in the "Data Filename" field and you can select another file by clicking on the button to the right of the input field.
When importing, to ensure that the section names used by the source
program are converted properly to SPACE GASS names, you should do the
following:
You can choose which components of the model to import by expanding the "Import" branch of the menu tree on the left and then clicking "Nodes" or "Members" as shown below.
![]()
You can specify the starting node number or, if you leave it at zero, the imported nodes will be automatically numbered starting from the first available number.
Nodes that are very close together can be merged into one, and the connecting members and plates adjusted to suit.
If you select the "Adjust lower limits of node coordinates by" checkbox, SPACE GASS will find the node with the lowest coordinates and move it to the coordinates that you specify. The rest of the model will also be moved by the same amount.
![]()
You can specify the starting member and plate numbers or, if you leave them at zero, the imported members and plates will be automatically numbered starting from the first available number.
Members that have an end very close to another member can be connected together. Similarly, members that cross each other within a specified distance can be subdivided and connected at the intersection point.
A number of programs that generate CIMSteel/2 files incorrectly mix radians and degrees when specifying member direction angles. If you are importing one of these non-standard files and find that some members are rotated incorrectly, you can select the "Assume radians for all angular measurements" checkbox to correct the problem.
For more information about the "Physical" and "Analytical" models, refer to "Physical and analytical models".