The instructions for installing a SPACE GASS floating network licence using a hardware are as follows. Ensure that you follow each step carefully.
This is a two stage process that involves installing the hardware lock on a computer attached to the network, followed by installing SPACE GASS on each computer that you wish to run it from. Ensure that you follow each step carefully.
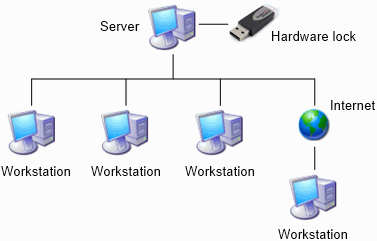
The hardware lock can be installed on a computer on its own (usually your network server computer) as shown below.
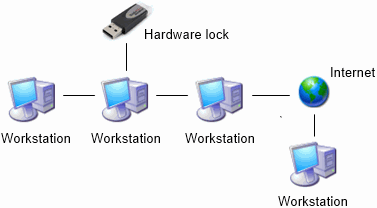
Alternatively, it can be installed with SPACE GASS on any one of the workstations.
Installing the hardware lock
If the network hardware lock has already been installed elsewhere on your network and you just want to install SPACE GASS on a workstation, you should skip this section and proceed straight to the "Installing SPACE GASS" section below.
If your hardware lock is numbered between 21810 and 49999 then it is a network lock, otherwise it is a stand-alone lock. If it is not a network lock then you should skip this section and follow the "Stand-alone Licence" installation instructions instead. Network locks can be operated as stand-alone locks, however stand-alone locks cannot be operated as network locks.
Before installing the hardware lock, you must decide which computer you wish to put it on. It will need to be a computer that is running most of the time and accessible to the workstations on your network. SPACE GASS itself does not have to be installed on this computer and, for large company networks, it is usually the network server.
Click here to go to the Thales website, click
the "Sentinel protection installer" link and then run the
software installation. Follow the installation prompts and accept
the default settings for each step until the installation is complete.
Plug
the network lock into the computer.
You
can generally skip this step and just come back to it if SPACE GASS
is unable to detect the hardware lock.
SPACE GASS must be able to detect the hardware lock across your network,
and therefore you must ensure that this is not blocked by your firewall
or network router.
For Microsoft TCP/IP networks, the communication with the hardware
lock is done via UDP port 6001. If SPACE GASS cannot detect the hardware
lock, you should open (unblock) UDP port 6001 by opening Windows "Control
Panel", opening "Windows Firewall", clicking the "Exceptions"
tab and then adding UDP port 6001.
If you have a network router or VPN (virtual private network), particularly
if the computer running SPACE GASS is trying to access the hardware
lock via the Internet, you must also ensure that the router is not
blocking communications through UDP port 6001.
You
should now proceed with the "Installing
SPACE GASS" instructions below for each computer that
you want to run SPACE GASS on.
Installing SPACE GASS
SPACE GASS
must be installed on each computer that you wish to run it from. It can
also be installed on the computer that contains the hardware lock, however
this is not essential.
Click
here to download the latest SPACE GASS program and save it to
your desktop.
When
the download is complete, double-click the downloaded file to install
it. Follow the installation prompts and accept the default settings
for each step until the installation is complete.
Re-start
your computer before proceeding further. If
you skip this step SPACE GASS may crash when you run it!
Double-click
the SPACE GASS shortcut on your desktop to start the program. SPACE
GASS will start and then require you to agree to the end user licence
agreement.
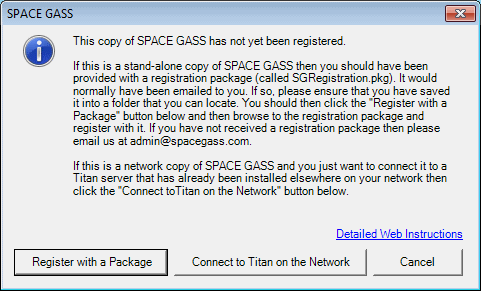
If
SPACE GASS is not yet registered, the following form will appear.
Click Yes if you have received a SPACE GASS registration package (called
SGRegistration.pkg) by email and have saved it from the email to your
desktop. If you haven't yet saved
it from the email then please do so before clicking Yes.
If you don't yet have a registration package, click No in this form
and also in the next form to exit the installation. Provided you have
purchased a SPACE GASS licence, you can obtain your registration package
by requesting it from admin@spacegass.com.
You
should then browse to where you saved the SPACE GASS registration
package (called SGRegistration.pkg). Select it and then click "Open"
to proceed to the next step.
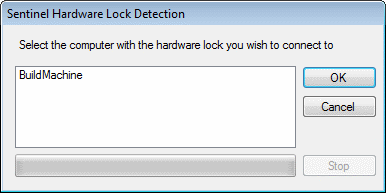
SPACE
GASS then searches for valid network hardware locks.
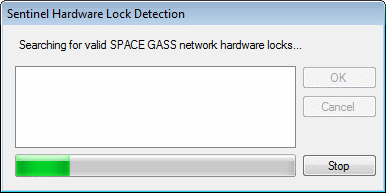
If it finds any it displays them in the following form. You should
select the lock you wish to connect to and click Ok to proceed to
the next step.
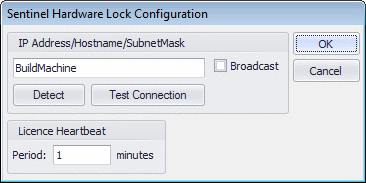
In
the following form you can simply click Ok or you can test the connection
or change the licence heartbeat period. It is recommended that you
simply keep the default settings.
Click here
to optimize SPACE GASS to use your hardware correctly (this is very
important).
SPACE GASS should now run.