Export links
You can export a CIS/2 Step file, IFC Step file or StaadPro file by selecting "CIMSteel/2 STEP (CIS/2, STP)", "IFC STEP" or "Staad.Pro STD" from the File => Export menu.
When exporting to Revit Structure, you can export a CIS/2 or IFC Step file or you can select the "Update Model from SPACE GASS" item from the Revit Structure "Tools > External Tools" menu as explained in "Special Revit Structure Links".
IFC Step file export
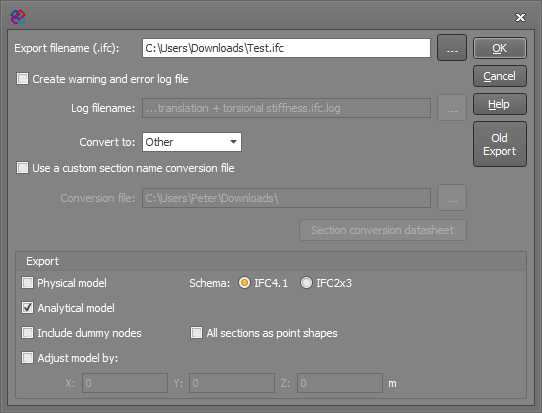
The IFC export form is shown below. The IFC exporter supports the IFC4.1 and IFC2x3 schemas. IFC4.1 is the default, but if you are transferring to an older program that doesn't support IFC4.1 then you should select the IFC2x3 schema. If another program can't read a file generated with IFC2x3 then as a last resort you could try clicking the "Old Export" button to revert back to the older style of IFC2 exporter.
If any warnings or errors occur during the export, you can view them at the end and then save them into a log file if required. Otherwise, you can tick the "Create warning and error log file" option and then specify a filename if you always want a log file to be created.
The "Convert to" box allows you to select the program that the IFC file is intended for. This is not always required, but it enables the exporter to convert the section names to those understood by the other program and apply any adjustments during the export that are specific to the other program.
If you have a custom section name conversion file then you can tick the "Use a custom section name conversion file" option and specify the conversion file to be used during the export. If you want to create a new section name conversion file, refer to "Creating custom section name conversion files".
You can choose to export the physical and/or analytical models. The analytical model is useful for programs like SPACE GASS that need to do a structural analysis of the model, whereas the physical model is intended for BIM or CAD programs that need to display a realistic looking physical representation of the model. For more information, refer to "Physical and analytical models".
Other export options include exporting dummy nodes, moving the exported model along a global X,Y,Z vector, and converting all the sections to point shapes. Point shapes should only be used if the other program that imports the IFC file doesn't recognise the section names and cross section shapes. They should only be used as a last resort because it is difficult for most structural analysis programs to perform any code design/checks on sections defined as point shapes.
Note that if exporting an IFC Step file to Revit Structure, you need to ensure that you have first specified a "Default Template for IFC Import" in the Revit Structure File menu => Open => IFC Options. Revit Structure default templates can be found in the "C:\ProgramData\Autodesk" sub-folders.
StaadPro file export
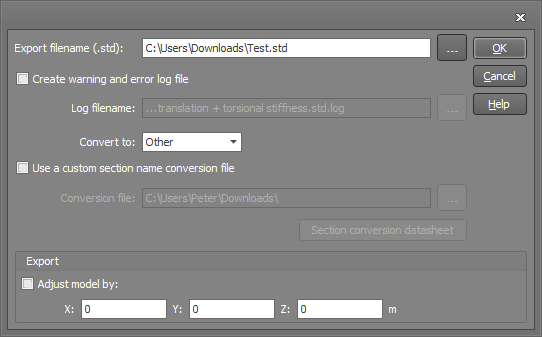
The StaadPro export form is shown below.
If any warnings or errors occur during the export, you can view them at the end and then save them into a log file if required. Otherwise, you can tick the "Create warning and error log file" option and then specify a filename if you always want a log file to be created.
The "Convert to" box allows you to select the program that the StaadPro file is intended for. This is not always required, but it enables the exporter to convert the section names to those understood by the other program and apply any adjustments during the export that are specific to the other program.
If you have a custom section name conversion file then you can tick the "Use a custom section name conversion file" option and specify the conversion file to be used during the export. If you want to create a new section name conversion file, refer to "Creating custom section name conversion files".
You can also move the exported model along a global X,Y,Z vector.
CIMSteel/2 Step file export
The CIMSteel/2 (CIS/2) export form is shown below. Note that plate elements can't be exported to a CIMSteel/2 file, however they can be exported to IFC, StaadPro, Revit or SDNF files.
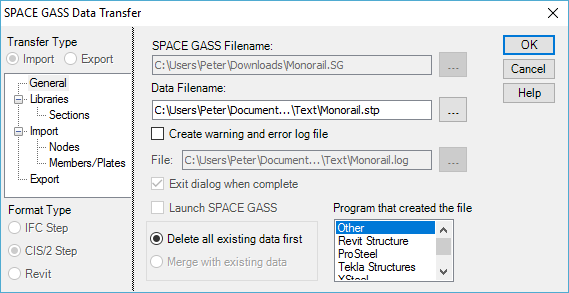
The name of the file being exported to is displayed in the "Data Filename" field and you can select another file by clicking on the button to the right of the input field.
When exporting, to ensure that the section names used by SPACE GASS are converted properly to the names used by the destination program, you should do the following:
- If you are linking with a standard program for which a section name conversion file exists, select it in the "Convert section names for" list box.
If the name of the program you are linking with does not appear in the list, it simply means that there is currently no standard conversion file for that program. If so, you should select "Other". You can then create and use a custom conversion file or use one that you previously created as explained in "Creating custom section name conversion files". Alternatively, you can just skip the custom conversion file option and the section names will be imported or exported with no conversion.
- Click the "Libraries" branch of the menu tree on the left to display the section libraries form as shown below.
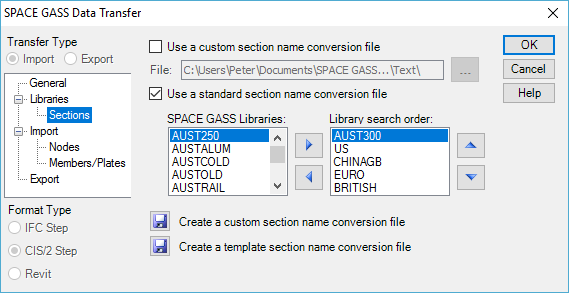
If you selected a program name in the "Convert section names for" list box in step 1 above, ensure that the "Use a standard section name conversion file" option is ticked. This will activate the section name conversion using the standard conversion files supplied with SPACE GASS.
If you selected "Other" in the "Convert section names for" list box in step 1 above, and you have a custom conversion file that you want to use, ensure that the "Use a custom section name conversion file" option is ticked and that the name of the custom conversion file is in the "Conversion filename" field. If you wish to create a custom conversion file, follow the procedure in "Creating custom section name conversion files".
If you wish to use a mixture of custom and standard conversion files, you can tick both the "Use a custom section name conversion file" and "Use a standard section name conversion file" options. In this case, SPACE GASS will try to convert the section name using the custom conversion file first and, if the name can’t be found there, the standard conversion files will be used.
You can choose which components of the model to export by clicking the "Export" branch of the menu tree on the left.
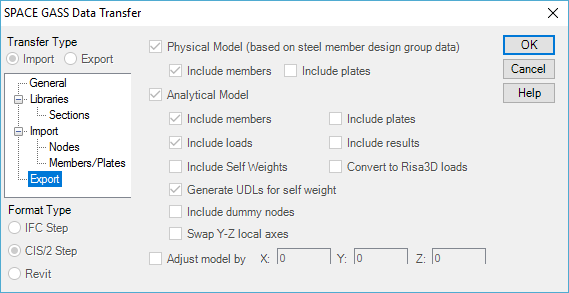
The normal procedure is to export the analytical model because, as well as the geometric information, it contains "hidden" information such as support conditions, member end releases, offset data, section and material properties, loads, load combinations, design data and analysis results. However, if you are exporting to a program that requires the physical model then you should select it. Note that when exporting from SPACE GASS, the geometric information in the physical and analytical models is the same.
For more information about the "Physical" and "Analytical" models, refer to "Physical and analytical models".