Filters
The filter tool allows you to restrict the amount of data that is displayed in the graphics display area or in output reports. You can use it to restrict the display to specific nodes, node types, members, member types, plates, plate types, plate thicknesses, section properties, material properties, steel members, steel connections, plate strips, axis limits or any combinations of these.
To create a filter from nodes, members or plates selected graphically
Select some nodes, members or plates graphically by picking them or by using the "Find" tool and then select "Create Filter" from the popup menu, after which the following form appears.
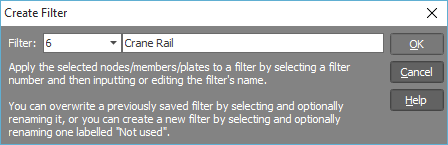
To save the current selection as a filter, just click the combo box in the above form, select a filter number and then type in the filter’s name. You can overwrite previously saved filters or you can select and name an unused filter.
An alternative method of creating a filter from nodes, members or plates selected graphically is to use the "Select" buttons in the main filters form as explained below.
To create or edit filters
Click the  toolbar button or select "Filters" from the popup menu.
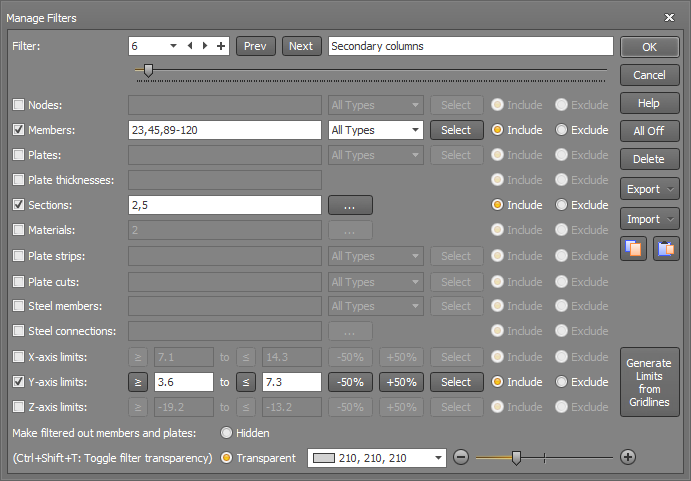
For each filter you can select one or more check boxes and then specify the corresponding items to be included in the filter. For example, if you specify a member list of 1,2-6,9,10 and a section property list of 2,3, the filter will include only those members in the specified list that use section properties 2 or 3. The more check boxes you enable and corresponding items you specify, the more you limit the nodes, members or plates that are included in the filter.
You can define up to 200 different filters and scroll between them in the form by changing the "Filter" numeric field.

The Include/Exclude buttons simply reverse the effect of the items in the filter line. For example, if you specify a node list of 2-5,9,13 and select "Include" then those nodes will be included in the filter. However, if you select "Exclude" then all the nodes except 2-5,9 and 13 will be included in the filter.

You can use the "Select" buttons in the "Nodes", "Members" and "Plates" lines to graphically select or edit node, member and plate lists rather than having to type them in manually. You can also use the "Select" buttons to graphically add to or modify filters that were previously defined using other than node, member or plate lists.
Filters can also be based on lists of steel design members or connections, or steel member design results.
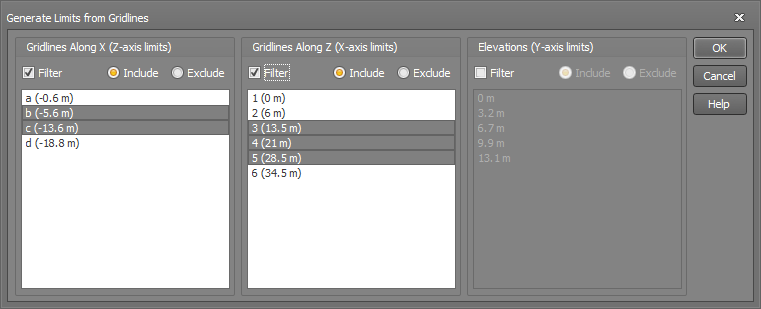
The "X-axis", "Y-axis", and "Z-axis" fields allow you to specify minimum and maximum limits for one or more axis directions. There are multiple ways to input the min/max values for each axis. You can enter ranges into the fields manually. You can also select them graphically by clicking their "Select" button. Any parts of the frame which fall outside of these limits are excluded from the filter. Alternatively, you can press the "Generate Limits from Gridlines" button, which brings up the following form, to input the min and max values based off gridlines.
The "Make filtered out members and plates" selection allows you to completely hide any members or plates that are not included in the active filter or show them transparent. You can also change the color and transparency of the filtered out objects.
To select and activate a filter
Click the "Filters" dropdown box  in the main toolbar and make your selection.
Scrolling through the filters can be most conveniently done using the keyboard Ctrl+Page keys as described in Shortcuts.
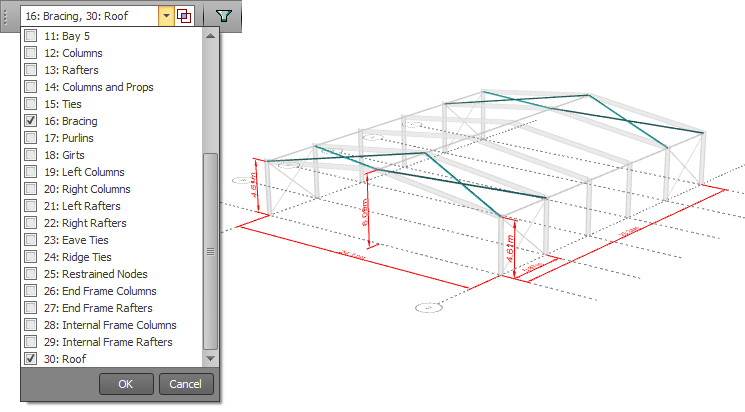
To select multiple filters
You can select multiple filters by opening the "Filters" dropdown box in the main toolbar and then ticking multiple boxes in the filter list.
You can also choose between "Union" or "Intersection" filters by clicking the  or
or  button to toggle between the union and intersection options. A "Union" filter displays the items that are in any of the selected filters, whereas an "Intersection" filter displays only the items
that are in all of the selected filters.
button to toggle between the union and intersection options. A "Union" filter displays the items that are in any of the selected filters, whereas an "Intersection" filter displays only the items
that are in all of the selected filters.
For example, you could include all of the internal frames of a portal frame building by choosing a union of all the internal "Frame" filters.
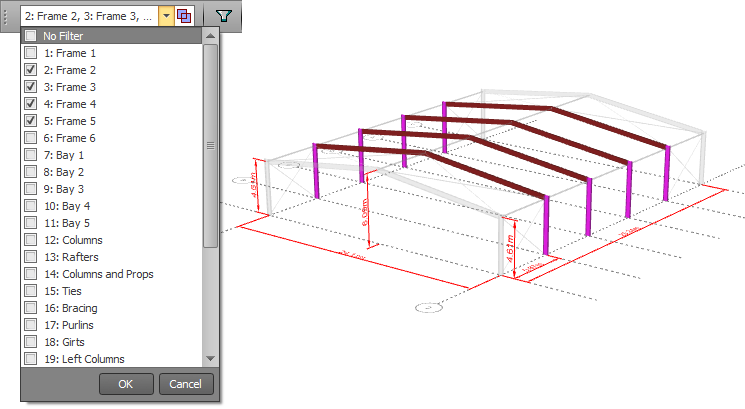
Alternatively, you could include just the roof bracing by choosing an intersection of the "Roof" and "Bracing" filters.
To import or export filters
Click the Import or Export button and then choose the type of file to import from or export to. You can import from MS-Excel or MS-Access. You can export to MS-Excel, MS-Access, or a text, PDF, RTF, HTML or CSV file.
The import/export tools are very handy if you want to transfer the filters from one job to another, or if you have generated them in a program such as MS-Excel and then want to bring them into your job.
Copy and paste
You can use the copy and paste buttons to transfer your filters from one job to another.
Temporary filters
The "Show selected items only" and "Hide selected items" tools allow you to temporarily filter out unwanted items without having to create a filter.